SQL

Sunday, 18 June 2017

Create Entity and View Controller


In this tutorial I will demonstrate how we can insert data into the database. For this purpose I have used the HR Schema. We will create a new application called HumanResource. We will automate the process to create all entity and view. There will be approximately 20 steps to follow.


 Model is the Business components of your application. You can put any name here.


After successfully create the model and view controller your projects will look like similar to this: 


Your application overview page should be open as soon as you create your projects Model and View Controller. Now Here we have option to create connection for the database and also Build the business services.


Make sure before you follow up the tutorial you have oracle database installed and have a database which has the HR Schema.


You can provide any Connection name as you like. Please provide HR user name and its password correctly. Also SID is the database name that contain your HR Schema. Don't forget to test connection before going to the next step. 


In the next step, we will configure our Business Services. Go to the Sup steps:


Make sure you select model in the pop up


Here it will ask again to configure the database which we already did previous step.


When you come up to this point press the Query button to get all the tables.


Select tables according to your needs and click the blue arrow to put them from left to right. You can also Name the entity as you like 


We are not creating any Query based view object here so skip to the next step


Rename the Application module if you like:


                                  You can create a diagram if you like but that's not required

Before you finalize these process you will have an option to see the summery


After successfully create the model and View controller projects, your application will look like the following:


Download: HumanResource.zip


Friday, 16 June 2017

Entity Object 1

Entity Object:

An Entity Object provides an Object Oriented representation of a row of a Database Table or a View.
It exposes access methods for its attributes that correspond to a table or view to access and manipulate the data. Attributes are simply the field or column of a table or a view. The ADF business components base class that implements the default entity behavior is EntityImpl.

<Entity> Impl

The Entity Implementation class (EntityImpl) class allows developer to expose typed attribute setter and getter methods , create attribute validations methods, access child collection in a master detail relation , retrieve the entity object key or modify the entity create and DML behavior.

<Entity> DefImpl

This class exposes methods to create new entity instances, find existinf entity instances and access entity properties.

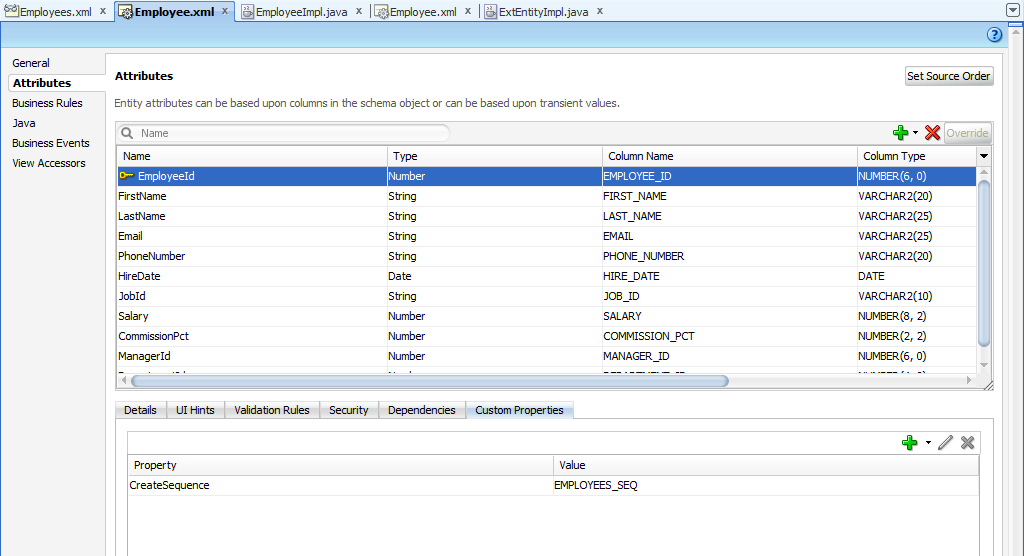
Lets show an example:


Here EmployeeId is the primary key and it has a custom property CreateSequence which refers to database sequence EMPLOYEE_SEQ. If we intent to work with this property than <Entity>Impl may have following procedure to follow:


Saturday, 27 May 2017

SQL 5: Join and Sub Queries Part 1


For this tutorial I will use the well known HR Schema of Oracle.There are several ways we can proceed to get the results. But here I am not showing the efficiency but the technique. This is a open question for the readers to find the more efficient result. The tricky part about Sub Queries and join are to figure that out which part will be on the sub query.
Scenario:

Find All employee and their job id and title.

Using Natural Join:

A NATURAL JOIN is a JOIN operation that creates an implicit join clause for you based on the common columns in the two tables being joined. Common columns are columns that have the same name in both tables.


Using Sub Query inside from. When we use sub query inside from then the fields are virtually becomes table name.


As we have seen some of the sub query. Let's try another one:

Scenario:

What about to find the Max Salary of all department?


Scenario:

Find First name, Last Name, department name and salary of all employees Descending order


Scenario:

Find Employee id, department name, Employee First name and the city where the department belongs.


SQL 4: Meta Data

Get the table name, owner and table space name beside user ="MITHUN"


Get all table name , owner and table space from a database


Saturday, 20 February 2016

PL/SQL Excercise 2


6. The Following PL/SQL will provide you all table name from a user table


SP

S

P


TOO MANY ROWS


TOO MANY ROWS


0 ROW NO DATA FOUND


JONES
SMITH

Statement processed.

PL/SQL Excercise 1


ADAMS

Statement processed.


11 Suppliers selected


The above Example also can be written as follows:


This Example canbe witten using a cursor as well.


S1 SMITH 20 LONDON
S2 JONES 10 PARIS
S3 BLAKE 30 PARIS
S4 CLARK 20 LONDON
S5 ADAMS 30 ATHENS


Number of suppliers in LONDON = 2


S1 SMITH 20 LONDON
S4 CLARK 20 LONDON

Statement processed.

PL/SQL


ADAMS

Statement processed.


11 Suppliers selected


The above Example also can be written as follows:


This Example canbe witten using a cursor as well.


S1 SMITH 20 LONDON
S2 JONES 10 PARIS
S3 BLAKE 30 PARIS
S4 CLARK 20 LONDON
S5 ADAMS 30 ATHENS


Number of suppliers in LONDON = 2


Friday, 12 February 2016

Android Example 3: Inner Class, Button and Count

This is the same example as Android Example 2. All I have done is, I just rearrange the code to show you an Private Inner class to show the button's OnClickListener
Step 1:

Create a Blank Activity on Android Studio. Name it anything you like.

Step 2:

Go to the layout folder and only keep activity_main.xml. If any other than activity_main.xml is created, just delete that. Now type the following lines for the layout.


Step3:
Open up your MainActivity.java file and type the following codes


Step 4:

Turn on your Emulator or GenyMotion. Run the Project and here you go .. a simple button functionality.


Android Example 2: Create a simple button with Count

I this Example I will make a simple button in to the main activity window. The button will have an option to press and count how many times you have pressed the button.

Step 1:

Create a Blank Activity on Android Studio. Name it anything you like.

Step 2:

Go to the layout folder and only keep activity_main.xml. If any other than activity_main.xml is created, just delete that. Now type the following lines for the layout.


Step3:
Open up your MainActivity.java file and type the following codes


Step 4:

Turn on your Emulator or GenyMotion. Run the Project and here you go .. a simple button functionality.


Saturday, 6 February 2016

Android Example 1: Create a Simple activity from Scratch

I wish I could go over details here but as I am a bit busy these days, I will just show you example of how to create a single activity from the scratch. So when you create a new Prject on Android Studio, we always find that somme xml files are auto generated + codes inside the main activity but Do we need all lines? What is the minimum requirements to create an activity?So here is the simple answer. Please go through Google android doc page to understand.

Step 1:

Create New Project suppose name is app1. Put the company name as buzz.com. As you enter finish. All files will be auto generated to launch a hello world app.

Step 2:

Delete everything inside MainActivity.java and write folowing:


Save the file.

Here launchOtherActivity method will be triggered when user will press the button. So yes, we have to create a button.


Step 3:

The Button has to be created inside the main activity xml file. Go to your layer folder (app1 -->app-->src-->main-->res --> layout). Delete all auto generated xml files here and create main.xml file and copy following code:


Here android:onClick="launchOtherActivity"/> will call the launchOtherActivity in the MainActivity.java.

Step 4:


Create another xml file for the other activity which is other.xml. Open the other.xml file and write following codes:


Step 5:

Now create OtherActivity.java in the same folder where MainActivity.java is. Copy the following lines to OtherActivity.java:


Step 6:
Now as we have a activity and it's related .xml file we have to add the activity to AndroidManifest.xml. Do not delete any line here but add the following:


so the AndroidManifest.xml will look like :


That's it. Now you will have a working OtherActivity. If you run the application. The output will be:


Thursday, 4 February 2016

GUI 6 Java polygon 1

This a simple java 2d poligon example. They have a common point (150,150) to intersect each other


Monday, 1 February 2016

STL List Container


0 8 9 1 8 7 2 3
0 1 2 3 7 8 8 9


Saturday, 30 January 2016

struct and vector in C++


hasan@lucid:~/Desktop/cpp/struct$ g++ -std=c++11 structVectror.cpp
hasan@lucid:~/Desktop/cpp/struct$ ./a.out
Joseph
18
Cashier
Tom
23
Sales man

Struct in C++

This example shows a simple use of struct


hasan@lucid:~/Desktop/cpp/struct$ g++ -std=c++11 struct.cpp
hasan@lucid:~/Desktop/cpp/struct$ ./a.out
Joseph
18
Cashier


Friday, 29 January 2016

Encrypt a String using Vector in C++

This application will Encrypt any message as an reverse format. As an example:
a --> z
b --> y

.....

Capital Letter was not in consideration. You have the idea to do it :D

It is always a good idea to see if the idea is working or not. So let's try the methodology first. If it works then we will start coding.


hasan@lucid:~/Desktop/cpp/vector$g++ -std=c++14 encrypt.cpp
hasan@lucid:~/Desktop/cpp/vector$ ./a.out
a-->z
b-->y
c-->x
d-->w
e-->v
f-->u
g-->t
h-->s
i-->r
j-->q
k-->p
l-->o
m-->n
n-->m
o-->l
p-->k
q-->j
r-->i
s-->h
t-->g
u-->f
v-->e
w-->d
x-->c
y-->b
z-->a


Now we can proceed to actual code to encrypt a message or string.


hasan@lucid:~/Desktop/cpp/vector$g++ -std=c++11 encrypt.cpp
hasan@lucid:~/Desktop/cpp/vector$ ./a.out
--- --- -- -----
blf ziv zm rwrlg

vector and resize vector in C++

This Example will demonstrate C++11 or above vector and how to use it. This following creates a vector of fixed size and calculate the sum. vector_size.cpp is the c++ file. You may also rename it to vector_size.cxx


hasan@lucid:~/Desktop/cpp/vector$ g++ -std=c++11 vector_size.cpp
hasan@lucid:~/Desktop/cpp/vector$ ./a.out
Entera value
1.1
Entera value
2.4
Entera value
3.5

sum = 7


This example will demonstrate how to resize the previous vector we created and calculate the sum.


hasan@lucid:~/Desktop/cpp/vector$ g++ -std=c++11 vector_size.cpp
hasan@lucid:~/Desktop/cpp/vector$ ./a.out
Number of values to Sum?
3
Entera value
1.1
Entera value
2.2
Entera value
3.3

6.6
hasan@lucid:~/Desktop/cpp/vector$


Saturday, 23 January 2016

GUI 5 Java JTextField and JPasswordField


GUI 4 JLabel and Icon

A JLabel object can display either text, an image, or both. You can specify where in the label's display area the label's contents are aligned by setting the vertical and horizontal alignment. By default, labels are vertically centered in their display area. Text-only labels are leading edge aligned, by default; image-only labels are horizontally centered, by default.


You can also specify the position of the text relative to the image. By default, text is on the trailing edge of the image, with the text and image vertically aligned

A label's leading and trailing edge are determined from the value of its ComponentOrientation property. At present, the default ComponentOrientation setting maps the leading edge to left and the trailing edge to right.

Finally, you can use the setIconTextGap method to specify how many pixels should appear between the text and the image. The default is 4 pixels.


The lebels and icon position will be changed as you change the window size.You need to use gridLayout() function to position the labels.

Friday, 22 January 2016

GUI 3 Java Layout Manager and Absolute Positioning

There are two approach to put button on a frame's content pane.

  • Using Layout Manager
  • Using Absolute Positioning

If you like to use absolute position then you must use 

setLayout(null);
setBounds(X screen, Y screen, Button Width, Button Height)

Absolute Positioning:


Layout Manager:

When you use Layout Manager like FlowLayout Manager then GUI objects are placed Top to Bottom ,from left to right. X and Y coordinates plus button size automatically created.


GUI 2

This example wil extend the previous example. It will use Container class to change the Background of the frame. In order to change the Background we need to access the content pane of a frame. A frame's content pane is the designated are which does not include title, menu bar and the border of the frame. It is the area where we can display content like text, image etc. We access the content pane of a frame by calling frames's getContentPane method and to change the background we will content panes's setBackground method.